Showing posts with label breakfast. Show all posts

Thursday, July 18, 2013

Sourdough Starter and Sourdough Waffles

Early this spring I decided to try my hand at growing my own wild yeast sourdough starter.  I had been baking a lot of regular yeasted breads at that point and, while successful, I was yearning to create bakery quality bread with more depth of flavor and a better crust.  By following some online directions and using a few books for guidance I was successful.  I have found a couple of invaluable resources that have helped me through the entire process.  Here are a few of my favorite links to get you started on growing and maintaining your own starter.
Wild Yeast
Tartine Bread Experiment
Discovering Sourdough
Tartine Bread
After the first week of life I decided to put some of my extra starter to work and I was delighted with this gorgeous batch of crisp and airy waffles.
Sourdough Waffles
adapted from KAF 

the night before prepare this overnight sponge:
overnight sponge
1 cup all purpose flour
1 tablespoon sugar
1 cup buttermilk
1/2 cup sourdough starter

waffle batter
all of the overnight sponge
2 eggs
1/4 cup vegetable oil
1/2 teaspoon salt
1 teaspoon baking soda
1 teaspoon vanilla

The night before, combine all of the overnight sponge ingredients.  Mix thoroughly and store at room temperature, covered overnight.  Do not worry about the buttermilk, it will not spoil.

In the morning, separate the eggs and put the egg whites in a medium bowl and whip until soft peaks form, set aside.  Whisk the egg yolks and oil in a large bowl and then add the overnight sponge, salt, baking soda, and vanilla.  Combine but be sure not to overmix the dough.  I use a fork and stir for about 30 seconds to 1 minute.  Gently fold the egg whites in using a spatula, you want to incorporate the egg whites in without deflating them too much.  Fill your heated waffle iron as you normally would and cook for about 3 minutes or until golden and crisp on the outside.

Monday, July 15, 2013

Banana Bread

We love this banana bread.   It turns out so moist and stays tasty for days, not that it ever lasts that long. I often make a double batch and place a bunch of muffins in in the freezer for an easy grab and go breakfast.  Another thing I do quite often is bake one tray of mini muffins and add a different mix-in to each row for a fun breakfast. Yesterday I did 2 rows each of of chocolate chip, blueberry, and pecan.  The kids devoured the blueberry and chocolate chip and I preferred the pecan.
I also happen to know that these muffins are very adaptable.  I have substituted yogurt or applesauce for half of the oil, substituted half whole wheat flour for all purpose, used 3 bananas if I didn't have four, and added all sorts of things like flax seed, wheat germ, and  more.  You just can't go wrong since they are a great base muffin...just don't skip the nutmeg!

Banana Muffins

3 cups flour
1 teaspoon baking soda
1/2 teaspoon baking powder
1 teaspoon salt
1 teaspoon cinnamon
1/2 teaspoon freshly ground nutmeg
1 1/2 cups sugar
1 cup vegetable oil
3 large eggs
1 Tablespoon vanilla extract
4 ripe bananas, mashed

In a stand mixer whisk the oil, sugar, eggs, and vanilla together.  In a bowl, whisk the dry ingredients together and add to wet ingredients.  Mix until fully incorporated.  Add bananas and mix until just incorporated.  Bake in a 325° oven.  Regular muffins will take about 18-20 minutes, mini muffins will take about 10 minutes and a large loaf or bundt will take over an hour.  I honestly do not ever time my muffins or cakes, I just use my sense of smell and eye ball it or use a toothpick inserted into the middle to test for doneness.

Monday, July 01, 2013

Oat Bread Tartine

My Hearty Oat Bread really makes this open faced sandwich substantial enough for a light lunch and healthier than a slice of regular sandwich bread.  I give the bread a good toasting before topping it with fresh veggies and a poached egg.

Oat Bread Tartine

1 slice oat bread (*recipe follows)
1 slice swiss cheese
thinly sliced zucchini
thinly sliced red pepper
lettuce
1 poached egg
salt and pepper
butter (optional)
Slice, and toast oat bread.  Spread with butter, if desired.  Add a slice of cheese while bread is hot.  Add sliced veggies and lettuce.  Top with a poached egg and season with salt and freshly ground pepper.

*Oat Bread
adapted from Kathleen's Bake Shop Cookbook
3/4 cup brown sugar, not packed
1 tablespoon salt
1 3/4 cups old fashioned oats
3 cups boiling water
2 tablespoon butter
2 1/4 teaspoons active dry yeast
1/4 cup milk
2 1/2 cups all purpose flour
2 1/2 cups white whole wheat flour
2 tablespoons wheat germ (optional)
1/4 cup flax seed (optional)
Place brown sugar, salt, and oats in a large bowl.  Pour boiling water over mixture, stir, and let stand for 30 minutes or until water is luke warm.  In a small bowl, sprinkle yeast over milk and let stand 5 minutes.  Add this to the cooled oat mixture and stir.  Combine flours, wheat germ, and flax seed.  Add half of it to the oat mixture and stir with a wooden spoon.  Slowly add remaining flour until all of it is fully incorporated.  Cover and let rest in a warm place until doubled in size, 1-2 hours.   I like to turn the oven on for a minute and then turn it off, this creates a warm draft free environment for the dough.
When the dough has doubled in bulk, punch it down and divide into two halves.  Place in greased loaf pans (sprinkle tops with extra oats, if desired), cover them with plastic wrap and place back in the warm oven to rise for 1 hour.  Preheat oven to 425°F and bake bread for 10 minutes.  Reduce oven temperature to 350°F and bake another 40-45 minutes.  Remove from heat, and turn loaves out onto a cooling rack immediately.  I tip mine on their sides to cool.   We normally eat one loaf and wrap the other cooled loaf in plastic wrap and then foil and store it in the freezer for later.

Thursday, June 13, 2013

Crepes : Sweet and Savory

Long ago I made dessert crepes for the kids and they were not at all impressed.  I think they were too young to appreciate the lightness of the crepes and confused by these delicate looking pancakes.   Afterwards, it took a very long time for me to get around to making them again.  The other day I had a craving for a savory crepe and I happened to have some ham and a hunk of cheese that I needed to use up so I decided to serve it up to the family and see what happened.  The ham and cheese crepes were delightful and I won over 3 out of 4 diners.
I thought 3 out of 4 was decent, but I'm a perfectionist sometimes and I was really determined to win the last member over so I made the extra crepes into dessert crepes.  I threw some chocolate chips and banana slices in the middle and warmed them in the oven.  As I brought them to the table I was pretty sure everyone would like them but I wasn't exactly prepared for how much the kids would love these crepes.  They went on and on and asked me to make seconds, which I promptly made for them.   And then they even begged me to promise I would make them for their birthday breakfasts when they came around.  It was too funny!  So, it looks like I will be able to make crepes again.  Yay me!

Crepes
makes 12-14 small crepes

1 1/2 cups milk
2 eggs
1 cup flour
1/2 teaspoon salt
1/2 teaspoon baking powder
1 tablespoon sugar

Whisk eggs, milks, and sugar together in a medium bowl.  Add dry ingredients and whisk vigorously until combined.  Heat a small pan over medium heat and spray with cooking spray and add a scant 1/4 cup batter and immediately lift and tilt pan and swirl the batter around and around to coat the pan.  Cook for about 2 minutes or until edges are dry and beginning to brown.  Flip with a spatula and cook for 20 seconds on the second side.  Remove and place on a foil lined pan and keep in a 300°F oven.   Repeat with remaining batter.

*To assemble, place 2 or 3 pieces of thinly sliced ham and a handful of shredded cheese down the center of each crepe.  Fold edges over and lightly press down to keep them in place.  Heat in over for 5-6 minutes or until cheese is melted.  Garnish with chives or green onions.

Thursday, May 23, 2013

Sourdough Doughnuts


I make doughnuts on Father's Day each year and maybe one other day during the year because I really  do not care for frying things.  It's messy, it's a waste of oil, it's unhealthy, I'm sure you understand.  But, I always make doughnuts on Father's Day.  For the past 5 or 6 years I've been using a perfectly delicious doughnut recipe and I wasn't in search of a new one...but I found myself mixing up a batch of doughnuts just the other day...a day that was not Father's Day.  But that is the kind of thing that happens when you are searching for something on pinterest...something that you didn't think would lead you to doughnuts, but you happened to see a page full of really tempting doughnut pictures plastered across your screen.  You repin one of those pictures and then you see it again and again whenever you log into pinterest and before you know it there you are mixing up a batch of doughnuts.  

Some things on pinterest don't live up to the hype, but these certainty do.  They are super fast to make and completely delicious.  They reminded us of the apple cider doughnuts we get when we take the kids to the pumpkin patch every fall.  Feel free to coat them in cinnamon and sugar, powdered sugar, a sugar glaze, or dip them in chocolate.  You really can not go wrong.  So delicious!!!

They do require sourdough starter though, so if you don't have any you will have to grow one which takes a good week or so...which means that you'd better start now!  By the way, sourdough starter isn't just for making sourdough bread...it makes a mighty fine batch of pancakes, waffles, english muffins, doughnuts, pita bread and more. 

Sourdough Doughnuts
adapted from Under the High Chair - click on the link for a shortcut method to making a sourdough starter if you want to make these but don't want to grow your own wild yeast starter.

1/2 cup sourdough starter
2 Tablespoons vegetable oil
1 teaspoon baking powder
1/2 teaspoon baking soda
1 egg
2 cups flour
1/2 cup sugar
1/2 teaspoon cinnamon
1/2 teaspoon salt
1/3 cup buttermilk
oil for frying

Fill a medium sized heavy saucepan with 2 inches of oil.  Over medium heat bring oil up to 360°F.  Line a sheet pan with newspaper or paper towel and set aside.
In a medium bowl, whisk the dry ingredients together.  In a large bowl whisk the wet ingredients.  Pour the dry ingredients into the large bowl and combine until a shaggy dough forms.  Flour the counter and transfer dough onto counter.  Knead a few times until all of the flour is combined and dough is smooth.  Dust the counter a bit more and then roll dough out until it is 1 inch thick.  Cut doughnuts out and reroll leftover dough as needed.  Fry doughnuts until they are a nice dark golden brown, make sure to flip halfway through to cook evenly.  Remove and place on lined sheet pan.  These taste best fresh.

Monday, May 20, 2013

Poached Eggs

I really enjoy a good poached egg.  The rich yolk oozes deliciously over a piece of hearty toast, add a little avocado and it makes the perfect breakfast.  I've poached plenty of eggs in the past, but I learned a little trick that helps the whites to stay together even better than the traditional way of poaching them in water spiked with vinegar.  By simply dropping the whole eggs in the boiling water for 10 seconds the whites firm up inside the shells just enough to keep them together once they are cracked.  Thank you PBS and Julia Child!!
 Perfect Poached Eggs

1 egg
1 tablespoon white vinegar

Heat water in a medium saucepan until lightly boiling.  Add vinegar and lower heat so it is does not boil too hard.  Add egg and slowly count to 10.  Remove egg and gently crack it and add to simmering water.  Simmer for about 3 minutes, or until whites firm up and do not jiggle too much.  Remove with a slotted spoon.
*It also works to poach a bunch of eggs and keep them on a warmed plate.  When you are ready to serve you can quickly slip them into hot water for a few seconds to bring them up to temp.  (Do not try heating them in the microwave or they may explode.  You can microwave a mug of water and then slip the egg into the heated water for a minute.)

Monday, May 13, 2013

Muesli

Muesli is another great option for a make ahead breakfast that is portable and perfect to eat on the go.  The first time I made this I was skeptical about the cold soaked oats and I was about halfway into it before I started to enjoy it.  These days, though, I actually look forward to it and start to crave it when I know I have one prepared and waiting for me.  I layer mine with yogurt, fruit, and granola in the morning like a parfait.  Stewed berries would also make a nice addition and I will be trying it soon.
 Muesli

1/3 cup rolled oats
1/3 cup apple juice (or other mild juice)
plain yogurt
fruit, fresh or dried
granola or toasted nuts

Combine oats and juice in a bowl or jar and let soak at least 4 hours or overnight in the fridge.  Top with a generous amount of yogurt, fruit, and nuts.  Add a drizzle of honey, if desired.

*I make three or four jars at a time and keep them in the fridge.  They easily keep for a couple of days.  I top them with yogurt and fruit once the oats are soaked sufficiently.   I add the granola just before eating.
*You can make them smaller or larger, just remember to mix equal parts oats and juice.

Monday, April 29, 2013

Blueberry Muffins with Yogurt and Flaxseed


My son and I made these muffins together one early morning and they were such a treat.  We substituted whole white wheat flour and added ground flaxseed and wheat germ to up the nutrition value and they were a delicious breakfast that I felt good about serving.   The kids are a little persnickety about "healthy" whole wheat versions of things like pancakes, but these passed the test and they devoured them.  They still have a good bit of sugar in them, but at least they are perfectly portioned so they can have one with a banana or pear to round out their meal.

Blueberry Muffins with Yogurt and Flaxseedmakes 10-12 muffins

2 eggs
1 1/4 cups sugar
1/2 cup canola oil
1/2 teaspoon vanilla
1 cup plain yogurt
1 cup all purpose flour
1 cup whole white wheat flour
1 tablespoon flaxseed
1 tablespoon wheat germ
1/2 teaspoon kosher salt
1/2 teaspoon baking soda
1 C fresh or frozen blueberries tossed with 1 tbsp flour

For the Crumb Topping:
1/4 cup brown sugar
1/2 cup flour
2 tablespoons butter, cut into small pieces
1 tsp ground cinnamon

Preheat oven to 375°F.  Whisk the eggs, sugar, oil, vanilla, and yogurt in a large bowl.  In a sperate bowl combine the dry ingredients and whisk together to get out any lumps.  Add dry ingredients to wet ingredients and stir to combine, do not overmix.  Toss frozen blueberries with a tablespoon of flour and gently fold into the batter.  Spoon batter into prepared muffin tins or tin lined with muffin cups.  Combine crumb topping ingredients in a small bowl and mix with fingers or a fork until sandy.  Generously sprinkle on each muffin and then bake for 20-25 minutes.  Muffins are done when a toothpick inserted into the center comes out clean.

Monday, April 08, 2013

Mom's Granola

This recipe comes to you from my mother's kitchen...she has made this for years and everyone loves it.  I can eat it for breakfast with yogurt or by the handful as a snack and I never tire of it.  That is precisely why I only keep one jar out at a time and freeze the rest!
Granola

4 cups old fashioned oats
1/2 cup light brown sugar
1-2 teaspoons cinnamon
1/2 cup honey
1 1/2 cups dried fruit (I used raisins and cranberries)
1 1/2 cup nuts (I used a combo of walnuts, slivered almonds and sliced almonds)
1/2 teaspoon salt
1/4 olive oil
1 teaspoon vanilla

Preheat oven to 250 degrees.  Mix oats, sugar, cinnamon, salt, and nuts in a large bowl.  Combine honey and oil and heat until dissolved.  (Stovetop or microwave work.)  Whisk in vanilla.  Drizzle over oat mixture and toss to coat.  Bake on a parchment-lined baking sheet for 50 minutes, stirring every 10 minutes.  Let cool completely and then break up and add the dried fruit.  Store in an airtight container for short term use or freeze flat in a ziplock bag.

Monday, March 25, 2013

Make Ahead Breakfast Burritos

I'm always on the search for make ahead dishes that are easy to reheat in the morning.  On weekdays my husband leaves the house before the sun is up and heads to the gym for an early workout or swim.  I often find myself scrambling to prepare something the night before, so I decided to make a huge batch of breakfast burritos and store them in the freezer so that he can grab one on those days when I don't have time to prepare anything fresh.  These burritos are packed with a hearty mix of roasted potatoes, sausage, peppers, onion, and cheese.  I made enough filling to make 20 burritos which are the perfect size to grab and eat on the go.  They should last in the freezer for months, but I'm willing to bet they won't last more than a few weeks since the kids kept an eye on me while I was assembling them!
Breakfast Burritos

4 russet potatoes
1 small onion, diced
1 red and/or green pepper, diced
1/2-1 pounds breakfast sausage
12 eggs
1 cup milk
1-2 cups grated cheese (I used colby/jack)
20 taco shells
olive oil
salt and pepper
steak seasoning/season all

Line a baking sheet with parchment paper and preheat oven to 400°F.  Wash potatoes and cut into 1 inch cubes.  Put potatoes on baking sheet and drizzle with olive oil.  Season with salt and pepper and your favorite mix of spices.  (I used a steak seasoning mix and a little rosemary.)  Toss to coat and bake for 20-30 minutes or until fork tender, remove and cool.
Heat a drizzle of olive oil in a large sauté pan over medium and add onion and peppers.  Cook 3-4 minutes and then add breakfast sausage.  Cook until vegetables are tender and sausage is cooked through.  Remove and let cool in a large bowl.
Using same pan add a pat of butter.  Whisk eggs, milk, salt and pepper in a large bowl and then add to sauté pan.  Cook until eggs are set and no liquid remains.  Add to bowl with sausage mixture, let cool.  Add cooled potatoes to mixture.
Once mixture has cooled completely, add grated cheese.  Heat 2-3 taco shells in the microwave for 20 seconds to make them pliable and add a large scoop of filling.  Roll burrito up and wrap it in foil or plastic wrap.  (We unwrap ours before heating so I use foil.)  Place wrapped burritos in large ziplock bags and store in freezer.
*I defrost one in the fridge the night before and then my husband heats them for about 45 seconds in the morning.  You could heat directly from the microwave if you desire.  Adjust microwave time accordingly.)

Thursday, March 14, 2013

Chocolate Chip Banana Bread

The title should really be Double Chocolate Chocolate Chip Banana Bread That Tastes Like Cake, but I thought that was a bit much.  This banana bread had rich Ghirardelli Cocoa as well as chocolate chips in it to make a deliciously flavorful and moist banana bread that is tender and cakey.  This was a great alternative to our regular banana bread recipe and it can double as a dessert.  It also freezes extremely well so you can slice it into single servings and pace yourself!

Chocolate Chip Banana Bread
adapted from a recipe my sister in law received from a friend

3 cups flour
1 1/2 cups sugar
1/2 cup Ghirardelli cocoa powder
1 1/2 tsp. baking powder
1 tsp. baking soda
1 tsp. salt
1 1/2 tsp. cinnamon
1 tsp. fresh nutmeg
3 eggs
1 cup vegetable oil
1 tsp. vanilla
3 large ripe bananas, peeled and mashed
1 cup semi sweet chocolate chips

Preheat oven to 325 degrees.  Prepare a bundt pan.  (2 loaf pans or muffin tins work as well)  In a stand mixer with a paddle attachment whip eggs, oil, sugar, and vanilla until light yellow.  In a separate bowl whisk dry ingredients together and then add to wet ingredients.  Mix until just incorporated.  Add mashed banana and chocolate chips.  Mix for 30 seconds.  Remove paddle attachment and fold batter with a spatula a few times and then transfer to the pan of your choice.
Bundt pan: start checking at the 45 minute mark by inserting a toothpick, cake is ready when it comes out clean.   Remove from oven and let cool 15 minutes before turning out on a cooling rack.

Monday, January 14, 2013

Cinnamon Rolls with Almonds

I blogged about this terrific bread last week and it didn't take long before everyone was asking me to make it again.  This time around I made the dough into these mini cinnamon rolls with an almond topping.  These were a yummy treat in the  morning...they came out of the oven a bit sticky and gooey, but not so decadent that you can't eat the rest of the day. The dough is easy to work with and it really is very versatile.

Cinnamon Rolls

Makes 2 pie pans of rolls

3 1/3 cups all purpose flour
1/4 cup wheat germ
2 tsp salt
2 tsp active dry yeast
2 Tablespoons olive oil
1 Tablespoons honey
about 1 cup very warm water


Almond Topping
6 Tablespoons butter
1 cup packed brown sugar
1/2 cup sliced almonds


In a measuring cup add olive oil and honey, then fill with enough warm water to measure 1 1/4 cups.
In the bowl of a stand mixer with a dough hook, add the flour, wheat germ, salt, and the yeast.  Mix with a spatula.  Turn mixer on low and slowly add the wet ingredients.  Increase speed to medium and mix for a few minutes until dough comes together and pulls away from the sides of the bowl.  (If dough is dry add a tablespoon of water at a time until it just comes together.)
Lower speed a notch and knead for 6-8 minutes.  Remove dough and form into a ball.  Place in a large greased bowl and cover for 1 1/2 to 2 hours or until doubled in size.  (Place dough in a warm area.)

Prepare two pie pans by placing 1/4 cup of sliced almonds in each pan.  Melt butter and brown sugar in a small saucepan and stir to combine.  Once mixture is thick and bubbly pour half of the mixture into each pan.

Divide dough into two portions.  Turn one portion of dough onto counter (I lined mine with plastic wrap for ease of clean-up) and flatten into a large rectangle about 1/4-1/2 inch thick.  Spread a bit of butter on the dough and then sprinkle generously with sugar and cinnamon.  Roll long end to long end and then slice rolls about 1 inch thick.  (I cut mine by sliding a piece of thread under and pulling up and crossing over to cut the dough without smushing it.)  Place rolls in pie pan leaving space between each roll.  Repeat with remaining dough and second pie pan.

Cover rolls and place in a warm area to rise for 1 hour.  Preheat oven to 350 degrees and bake rolls for about 25 minutes or until browned.   Remove and let cool 15 minutes before turning out onto a plate.  (Simply place a plate on top of the pie pan and quickly but very carefully flip and tap a few times to release the rolls.

Thursday, January 03, 2013

Cinnamon Swirl Bread

I'm glad I thought to take a picture of this bread before it was completely devoured the day I made it.  I wanted to make a single loaf, a half batch, just to make sure the bread was as good as it was claimed to be.  Don't you just hate it when you waste so much time, energy, and ingredients on something that turns out to be so-so?  Me too!
This bread turned out to be just as tasty and versatile as it claimed to be.  A bit of cinnamon and sugar elevated this basic loaf of bread into a delicious cinnamon swirl bread that came out perfectly hearty and tender at the same time.  Warm from the oven and slathered with butter, half the loaf was inhaled by my little ones.  It tasted just as good the next day.  Next time I am going to make the full batch, 2 large loaves, and save some to slice thick for what I image will be a delicious french toast.

Cinnamon Swirl Bread
adapted from remedialeating.com
Makes 2 loaves

6 2/3 cups all purpose flour
1/2 cup wheat germ
4 tsp salt
4 tsp active dry yeast
4 Tablespoons olive oil
2 Tablespoons honey
2 1/3 cups very warm water

In a measuring cup add olive oil and honey, then fill with enough warm water to measure 2 1/2 cups.
In the bowl of a stand mixer with a dough hook, add the flour, wheat germ, salt, and the yeast.  Mix with a spatula.  Turn mixer on low and slowly add the wet ingredients.  Increase speed to medium and mix for a few minutes until dough comes together and pulls away from the sides of the bowl.  (If dough is dry add a tablespoon of water at a time until it just comes together.)
Lower speed a notch and knead for 6-8 minutes.  Remove dough and form into a ball.  Place in a large greased bowl and cover for 1 1/2 to 2 hours or until doubled in size.  (Place dough in a warm area.)
Divide dough into two portions.  Turn one portion of dough onto counter (I lined mine with plastic wrap for ease of clean-up) and flatten into a large rectangle about 1/2 inch thick.  Spread a bit of butter on the dough and then sprinkle generously with sugar and cinnamon.  Roll short end to short end, tuck ends under and place in a buttered loaf pan seam-side down.  Repeat with remaining dough.
Cover dough and place in a warm area to rise for 1 hour.  Preheat oven to 350 degrees and bake breads for about 35 minutes.   Remove and let cool 15 minutes before slicing.

Thursday, December 13, 2012

Martha Knows Pancakes


The kids love pancakes and I alternate between two recipes...I don't know why...but my son loves these and I like the others.   If I mention pancakes he'll always ask "Are you going to make the good ones?" and these are the ones he's referring too.  Funny how everyone has a preference.  Don't get me wrong, these taste light and fluffy and are a breeze to make.  I do like them...I like them even better the second day toasted in the toaster and then smeared with peanut butter and jelly to be exact.

Buttermilk Pancakes
adapted from marthastewart.com
2 cups flour
2 tsp baking powder
1 tsp baking soda
1/2 t salt
3 Tbsp sugar
2 eggs - beaten
3 cups buttermilk
4 Tbsp butter, melted

Heat the griddle on medium heat.  Whisk the dry ingredients in a large bowl.  Add the eggs, buttermilk, and butter to dry ingredients.  Whisk to combine, do not over mix, lumps are fine.  Oil griddle, or melt a small pat of butter and then brush it around the griddle with a pastry brush to coat.  Pour pancake batter onto griddle with a 1/2 cup measuring cup (or eyeball it like I do) and cook until bubbles appear and edges are dry, 2-2/12 minutes and then flip.  Cook 1 additional minute.

If you like crisp edges use more oil or butter between each batch so there is enough to slightly fry the pancakes.

Tuesday, November 13, 2012

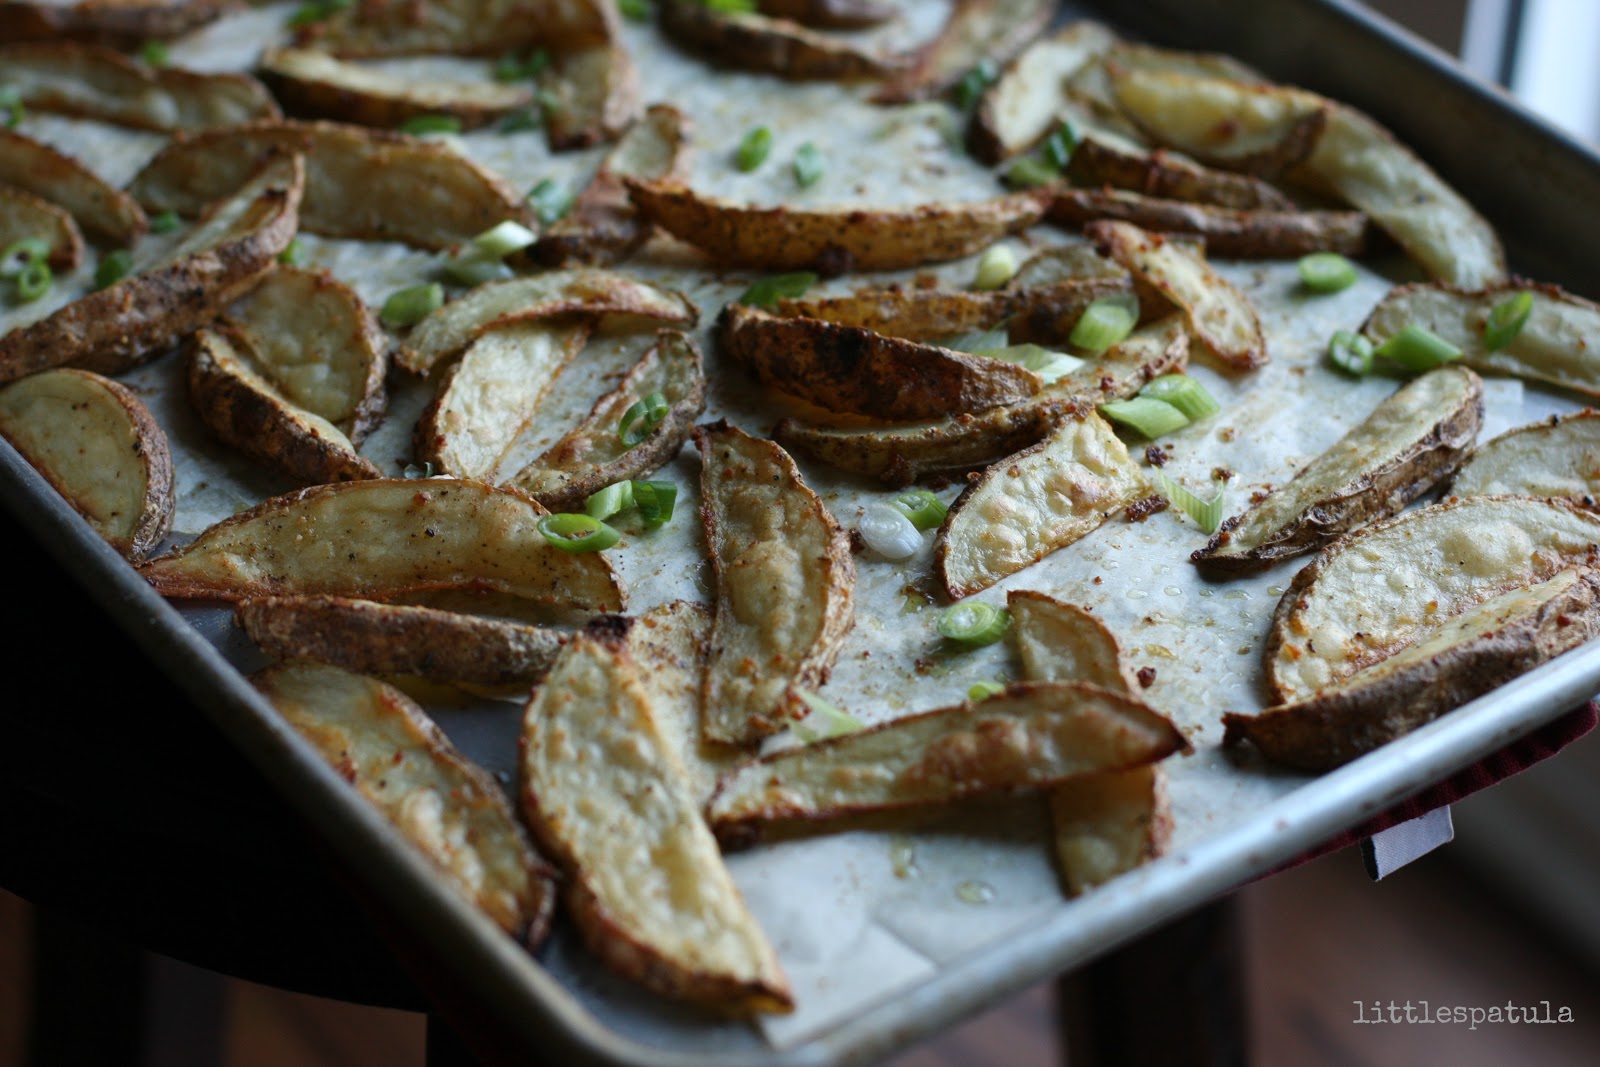
Oven Fries

These oven fries are a delicious addition to any weekend breakfast.  We enjoy them with scrambled eggs and fruit.  They also are stellar with dinner if we're serving fried chicken, chicken fingers, sandwiches, steak, or grilled chicken.  The kids really love these and I like them on the crispy side, but bake them however you like them.  I start checking around 20 minutes or so and spear one with a fork to test.  Make sure they are cooked through, biting into an uncooked potato is the worst.

Oven Fries
3-4 large potatoes
1 T flour
1/4 cup parmesan cheese
1 tsp salt
1/2  fresh ground pepper
1 tsp.  smoked paprika or "season all"
olive oil - a few glugs
1-2 green onions - reserved

Heat oven to 400 degrees.  Wash potatoes and cut into wedges.  Drop onto a sheet pan lined with parchment paper.  Add all remaining ingredients  and toss with hands.  Spread out into a single layer and bake 25-35 minutes (depends on thickness of potatoes) until potatoes are cooked through and browned on edges.  Pull out of oven and add green onion, I just take a pair of kitchen shears and cut the onions over the top of the pan and serve with ketchup.

Thursday, November 01, 2012

Oatmeal with Coconut Milk and Caramelized Pineapple

I make oatmeal pretty often and enjoy it in a variety of forms.  I have been known to stir in a bit of peanut butter and jelly or top it with nuts, raisins, cinnamon, and a splash of milk...always good, but it's always a treat to add another flavor combination to the rotation.
I used what I had in the fridge to create this delicious new-to-me combination of coconut milk, pineapple, and muscovado sugar.  Oh my, talk about delicious!!  I hope you'll give it a try!

Oatmeal with Coconut Milk and Caramelized Pineapple  - serves 1
1/2 cup water
1/2 cup coconut milk
1 T sugar
1/4 t salt
1/2 cup old fashioned oats
1/4 cup pineapple chunks
1 T muscovado sugar or brown sugar

Bring the water and coconut milk to a boil.  Add 1 T sugar, salt, and oats.  Cook about 5 minutes, stirring occasionally until oats are cooked.  Pour oat mixture into a small bowl.  Rinse pan, if necessary, add pineapple chunks and muscovado sugar and sauté quickly over medium high heat until sugar melts and pineapple is warm. Pour over oatmeal.  Add a splash of milk if desired.
Look who snuck in after the photo shoot to gobble up the warm oatmeal!  

Sunday, October 28, 2012

Chocolate Chip Scones

These chocolate chip scones are a family favorite in our house.  I've probably made them 100 times and everyone still gets excited about them!  They are tender, fluffy, sweet, big, and delicious.  They are the perfect breakfast treat with a hot cup of tea.

Chocolate Chip Scones
2 cups flour
1/4 cup sugar
2 t baking powder
1/4 t baking soda
1/4 t salt
5 1/2 T cold butter, cubed
1 egg, beaten
1/2 cup buttermilk
1/2 cup semi-sweet chocolate chips
2 t sugar - the large decorator-type if available
1 T buttermilk

Stir together the flour, sugar, baking powder, baking soda, and salt.  Add butter and cut with a pastry cutter until mixture resembles coarse meal.  In the center add the beaten egg, buttermilk, and chocolate chips.  Stir mixture together with a fork until flour is incorporated, take care not to over mix.  Use hands to form dough into a ball and place onto a parchment-lined baking tray.  Form into a disc about 1 inch thick.  Use a large knife to cut into 6 wedges and then separate the wedges on the baking sheet to allow room for them to expand while baking.  Brush tops with buttermilk and sprinkle with sugar.  Bake at 400 degrees for 12 minutes or until golden.

Options:  You can make mini scones by separating dough into two discs and cutting each disc into 6 wedges.  You should get 12 mini scones.
Cranberries or currants also make terrific additions instead of chocolate chips.

Wednesday, October 17, 2012

Vegetable Quiche with a Rosemary Crust

I've been on a mission the past few months to come up with some new items to enjoy for breakfast. The kids really enjoy muffins, pancakes, waffles, and other bready breakfast items, but I need food that has more fuel and staying power than that.  So, I've been trying to make a few things that I can have in the fridge to grab for my own breakfast while still giving them the options that they enjoy.  I recently made this quiche for dinner and then I had the leftovers for breakfast the next two days in a row.  It was yummy and satisfying and I wasn't required to do any additional work to feed myself a healthy breakfast during those busy weekday mornings.

Vegetable Quiche
for the rosemary crust:
1 1/2 cups flour
1/2 t salt
1/2 cus plus 2 T vegetable shortening
1 T fresh chopped rosemary
1 egg
3-5 T ice cold water
1/2 T white vinegar

Stir the flour and salt together and then cut the vegetable shortening in with a pastry cutter until mixture looks like coarse meal.  Add rosemary.  In a separate bowl beat the egg with 3 T water and vinegar until it comes together.  Add half of the egg mixture to the flour mixture and stir with a fork adding more water as necessary until it comes together and just starts to form a ball.
Lightly dust your work surface with water and turn dough out onto surface and form it into a ball and lightly knead until it just looks incorporated.  Form into a disk and wrap with plastic wrap and refrigerate for 30 minutes or more.

for the filling:
1 T butter
1 small onion, diced
1 clove garlic, minced
1/2 cup red pepper, diced
4 oz spinach
1 cup cherry tomatoes, halved
5 eggs
1/4 cup milk
1/4 parmesan cheese, plus 1 T for top
1/2 cup jack or cheddar cheese
salt and pepper

Melt butter in a medium saute pan and add the onion and cook until it begins to soften.  Add garlic, red pepper, and seasonings and cook an additional 5 minutes.  Add spinach and cook until spinach wilts...remove from heat and allow to cool.  In a medium bowl beat the eggs, milk, parmesan cheese, and salt and pepper.  Add cooled vegetable mixture and cherry tomatoes.

To assemble:
Roll out dough and line a 9-inch pie pan, prick crust with a fork.  Bake at 400 degrees for 7-10 minutes or until slightly brown.  Reduce heat to 350 degrees.  Add egg mixture to crust and bake for 45 minutes or until center is set and knife comes out clean when inserted.  Remove from oven, sprinkle remaining cheese on top and bake an additional 5 minutes or until cheese is melted.

Friday, October 12, 2012

Butternut Squash Muffins

Today I have another spin-off of our beloved muffins that I'm going to share with you.   Last week I used leftover sweet potatoes to make some tasty muffins that were met with rave reviews from the kids.  Another vegetable that they don't particularly like is butternut squash.  I made two of them last night and as I was packing up the leftovers it dawned on me that I could make muffins with it since it is so similar to pumpkin or sweet potato puree.  So this morning I pulled it out of the fridge and got to work.  The kids actually helped put the squash into the batter and were anxious to try the muffins to see if they tasted as good as the sweet potato muffins.  They could hardly wait for them to cool before they each ate 5 mini muffins and a regular size muffin.  Muffin success!

Butternut Squash Muffins
1 cup cooked butternut squash
2 eggs
1/2 cup vegetable oil
1/4 cup water
3/4 cup sugar
1/4 cup brown sugar
1 3/4 cups flour
1 t baking soda
1/2 t salt
2 t cinnamon
1/2 t fresh nutmeg
In a medium bowl, whisk dry ingredients together and set aside.  In a large bowl, combine squash, eggs, oil, water, and sugars.  Stir the dry ingredients into the squash mixture until just combined.  Pour into prepared muffin pan.  Bake at 350 degrees until toothpick comes out dry, about 12-15 minutes for mini muffins or 15-20 minutes for larger muffins

Wednesday, October 03, 2012

Sweet Potato Quickbread

We always have some type of quick bread in the house...banana, zucchini, and pumpkin are favorites around here so I was pretty sure everyone would like this sweet potato version.  Even though the kids are not huge fans of baked sweet potatoes they gobbled up these muffins.  I just threw in a few extra spuds when I baked potatoes for dinner earlier in the week and then reserved them for these muffins. We ate them for breakfast and snacks through the week.  They also freeze extremely well, just toss in a freezer bag and place in the freezer.  To defrost, simply take them out a few hours or the day before you wish to eat them and they taste just as fresh as the day they were made.

Sweet Potato Quickbread
1 1/4 cups sugar
1/2 cup vegetable oil
2 eggs
1 3/4 cups flour
1 t baking soda
1/4 t salt
1 t cinnamon
1/2 t fresh nutmeg
1/3 cup water or orange juice
1 cup mashed sweet potatoes
1/4 chopped nuts(optional)

Beat sugar and oil until combined.  Add eggs and beat together.  In a bowl combine flour, baking soda, salt, cinnamon, and nutmeg.  Stir half of flour mixture to egg mixture alternate with water.  Stir in mashed sweet potatoes and nuts, if using.
Bake in mini muffin tin for 12-15 minutes at 350 degrees or two 9x5 loaf pans for about an hour.

Posts You Might Enjoy

Related Posts Plugin for WordPress, Blogger...